In case you’ve somehow missed it, film photography is making a massive comeback! This type of photography started in 1888 with the invention of “The Kodak” camera, eventually giving it a place among the masses. Recently, the photography industry has seen a notable resurgence of this medium. While many professional photographers transitioned to DSLR and now mirrorless camera systems, many are diving back into film.
Why film?
For lovers of film stills, film photography techniques and visuals can’t be replicated with digital cameras. Yet for people new to the medium, it can seem daunting. Luckily, the seasoned film photographers at KEH have plenty of advice to help you get started. If this is your first time trying out film photography, or you’re still learning the ropes, these tips are for you!
8 Film Photography Tips
This type of photography is all about going back to the basics. For digital photographers, one struggle with this type of photography is the pressure to have all the camera settings right to produce the perfect image, rather than being able to edit and “fix” digital images in post production. It requires the photographer to have enough knowledge of light, exposure, aperture, shutter speed, light metering, and composition to get shot every time. Another challenge digital photographers face when acclimating to film photography is not having instant feedback regarding the composition and exposure of each shot.
In this article, we will explore 8 tips for beginners, from learning the basics and finding the right gear to developing the film.
1. Start with a high-quality, yet affordable camera
The first step is to get your hands on an affordable film camera! Your beginner camera shouldn’t break the bank, since you’re still learning the ropes. If you can’t borrow one from a friend, buying used is the best way to find a high-quality film camera at a great price while you’re still learning.
Start simple with a 35mm camera with a prime lens like a 35mm or 50mm, which will provide better quality images because of the wider apertures available with those lenses. KEH has plenty of inventory of used film cameras that make a great starting place for both novices and experienced photographers.
2. Understand the basics: film photography vs digital photography
One of the best ways for photographers to grasp this medium is understanding how it differs from digital photography. The main difference between film and digital is the technology used to capture images. Digital cameras use a sensor that captures the image then stores the file on a memory card. Film photography stores the images on roles of film (film stocks), which then need to be developed.
With digital photography, you’re able to immediately see the image taken, while with film photography, you won’t see the image until the film is developed. For many people, this process acts as evidence of a moment in time that cannot be changed or edited, making each image all the more meaningful.
3. Master the exposure triangle
Understanding the basics of light and how your camera uses and creates images with different lighting situations is essential. How your camera is able to capture light consists of three key elements–aperture, shutter speed, and ISO–collectively known as the exposure triangle. Mastering each of these elements will ensure you are able to create stunning film images with your camera every time. Let’s dive deeper into each of the three exposure triangle elements.
- Aperture refers to the opening of the camera lens that allows light to pass through to the film or sensor. When you set or adjust aperture, you’re telling the lens how much light you want allowed in. Lenses have aperture rings that can be adjusted to allow more or less light through the lens. These adjustments are called “F/stops” and typically range from as low as f/1.2 (“wide open”) to as high as f/22 or more (“stopped down”) . The lower the f/stop number, the more light your lens will allow to pass through to the film.
- Depth of Field (DOF): Aperture also plays a key factor in an important optical property called “Depth Of Field” (sometimes called “Depth of Focus”). When a lens aperture is set to allow more light in (lower f/stop number), the range of in-focus distances will be shallower than if the same lens had been set to a higher f/stop. So, portrait photographers tend to favor lower f/stop numbers to achieve “shallow depth-of-field” to blur backgrounds and landscape photographers tend to prefer somewhat higher f/stop numbers for greater depth-of-field to get more in focus.
- Shutter speed is the button you press (the shutter) that will momentarily open your aperture. Your shutter speed determines how long your aperture stays open. For instance, if you are shooting in bright sunlight, you’d want a faster shutter speed that only keeps your aperture open for a fraction of a second. But if you’re shooting the stars–otherwise known as astrophotography–you may have a shutter speed of 30 seconds or more to maximize how much light is allowed in during nighttime.
Shutter speed largely determines how much motion blur is captured (including your own motion if not holding perfectly still). Faster shutter speeds freeze motion better. Slower shutter speeds will show more motion blur. Motion blur might be unwanted when photographing sports, while motion might be desirable if you’re using a tripod to take a time lapse or long exposure of a waterfall.
- ISO is a numeric value referring to how sensitive your camera’s sensor or film will be to light. Higher ISO films are more sensitive to light, but also have more pronounced or coarse ‘film grain’. Lower ISO films require more light to form an image but have ‘finer grain’. Most general purpose films are between ISO 100 and ISO 400 to balance the trade off between sensitivity and graininess. Experienced photographers seeking ultra-fine grain might even use films rated at ISO 25. ISO 800 and above is considered high-speed film. The upper end of the ISO range is usually considered ISO 3200 at which point images turn out very grainy.
- Three key things to know and remember about ISO:
1. When loading a roll of film, always ensure you check/set your camera or light-meter to match that film’s ISO sensitivity. Some cameras from the 80s onward do this automatically when using “DX-coded” film, but earlier cameras don’t, so it’s essential to double check.
2. Sometimes photographers refer to ISO as ‘Film Speed’ but it’s not the same thing as ‘Shutter Speed’, they’re related things but not the same thing. Don’t let that trip you up.
3. ISO 200 is twice as sensitive to light as ISO 100. ISO 400 film is four times as sensitive as ISO 100. ISO 800 is eight times as sensitive as ISO 100, and so on.
These three elements work together to help photographers create incredible images right in their film cameras using light. Understanding the exposure triangle is imperative as the image you create in camera is the final image produced on the film.
Many film photographers recommend using a light meter to perfectly expose their images. It isn’t widely used in digital photography as most digital cameras have built-in light meters for correct exposure. However, many film cameras need an external one to assist with calculating the best exposure for your shot.
You can buy an external light meter at most camera stores or online, or you can opt to try a light metering app on your smartphone.
4. Understand and use manual focus
Using manual focus is key to sharp film images. With today’s digital cameras, autofocus technology offers features like eye and subject tracking that make it easier than ever before to quickly lock onto the exact areas or spots you want as the main point of focus, even while they’re moving and when you don’t have much depth-of-field. For film photography, if your camera even has autofocus, the technology is not nearly as advanced, so understanding and using manual focus is essential to capturing subjects in focus, producing the clearest images.
Pro Tips for focusing manually with film cameras:
- Start with focusing non-moving objects like buildings, trees, plants, or stationary vehicles before attempting manual focus with moving subjects.
- Use a prime lens so you can force yourself to move around your subject and practice focusing from different lengths and angles.
- Prime lenses also produce a brighter image through SLR viewfinders. That brighter finder image will not only help your manual focusing but your autofocus as well since the technology is less responsive under low-light conditions. Another trick is to favor the center autofocus point. Center focus points are more likely to be “cross-type” phase detection sensors, they’ll be more sensitive than the rest. When using that center point, also try “focus-holding” by pressing the shutter button halfway down to focus where you want, then reframe the image as you like before pressing the shutter button the rest of the way down.
- Practice zone focusing by choosing a zone and positioning yourself in such a way as to keep the subject in that specific range. To help you estimate your margin of error, many older lenses from the manual focus era feature depth-of-field marks for certain apertures right next to the focus distance scale.
5. Experiment with different film types
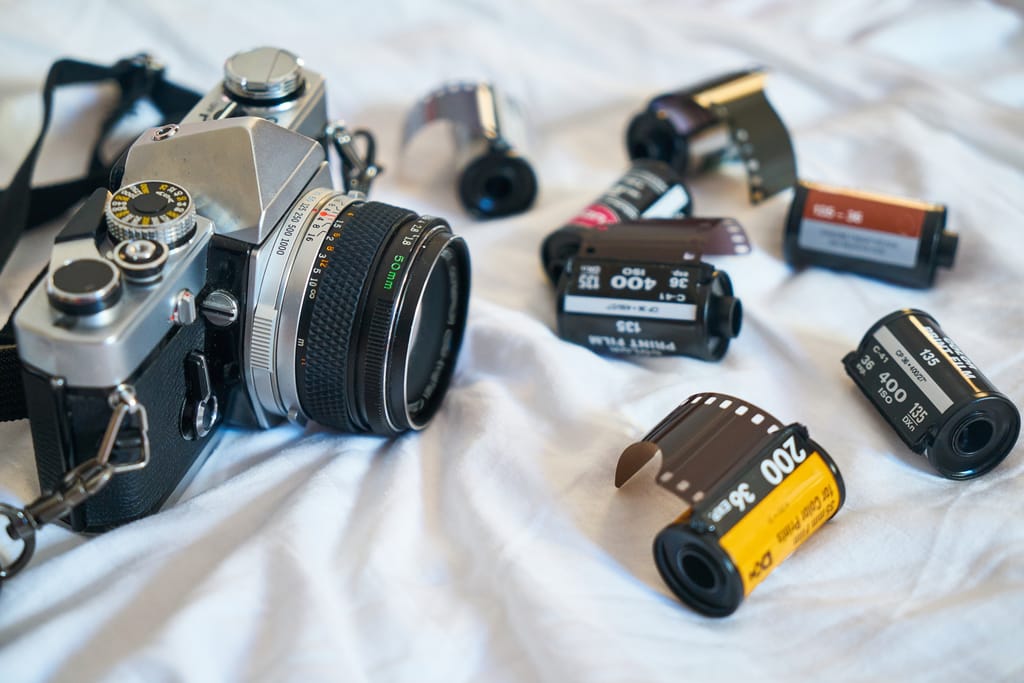
Your choice of film will establish key visuals like colors, exposure grain in the images, and shadows. Though the amount of types available isn’t as broad as it was in the height of film photography, there are still plenty of film stocks to choose from and experiment with. The most common film size is 135 (also known as 35 mm) or you can experiment with medium format (120) film.
These are the main types of film stock:
- Color negative: Generally, this is the most popular and readily available kind of film, making it a great choice for beginners. Color negative film is developed in a photo lab using a process called C-41 and is relatively easy to have developed. It can often be more cost effective to develop since it’s done by machine.
- Black and white negative: This type of film stock is popular with photographers who aim to create a more cinematic and artistic feel in their photography. This is also the type that you can easily develop in a darkroom or at home, so if this is a goal for you, black and white negative film might be a good starting point.
- Slide film: Also known as “transparency” film or “chrome” film, this type is often used by professional photographers as it produces a positive image on the film, meaning the image can be seen directly on the slide. Slide film is more finicky about accurate exposure due to intolerance of overexposure and a narrower “exposure latitude range”. Plus the requisite E-6 development process (rest in peace KodaChrome) is more complex, but positive images generally scan cleaner. We recommend starting with one of the two types above before attempting to use this.
When choosing the right film stock for your photography, there is no “wrong” choice–it’s simply a matter of deciding what overall aesthetic you want in your film photos. Different types will produce different images, so understanding the advantages and limitations of the film you’re putting into your camera is part of the learning curve. Experiment to achieve the artistic look you’re aiming for! Also be sure to practice how to cautiously load and unload film to prevent it from being harmed in the process.

6. Get creative with composition
Composition in photography is the practice of framing your subjects or landscape in a manner that elicits emotion, mood, and connection from your audience. Composition involves elements like framing, angles, movement, scale, setting, and colors.
Experiment with your composition to see what works for you and what doesn’t. Here are a few key composition methods:
- Scale: Scale refers to the size of the subject you’re framing. Factors like lens choice and how close or far you are away from your subject when shooting will change the scale of your subject. A wide-angle lens will provide more setting and background in your photo, telling the story of the subject in the setting. Meanwhile, a telephoto lens will provide a more compressed, close-up composition of your subject, evoking a different emotion and telling a different story altogether.
- Angles: Taking photos at different angles can provide a completely different feel to the same subject, pose, or setting. For instance, crouching down and shooting up at your subject will create a different composition than taking the photo from above or to the side.
- Space: Knowing how much space to leave above, below, and beside your subject is another part of film photography composition. The “Rule of Thirds” is a helpful standard for framing your subject. This rule has a photographer divide the image into thirds and position the subject or subjects within those sections. But keep in mind, as helpful as it is to abide by the Rule of Thirds when learning composition techniques, it can be equally as fundamental to learn how to “break” this rule when experimenting.
- Color: Pops of color in a photo can be extremely helpful in channeling emotion within your composition. Specific colors may elicit subconscious emotions (think red for love or passion) for your audience, so playing with color can be fun!
- Movement: When photographing moving subjects like people or animals, capturing their movement can convey a different emotion than if they are stationary. Having your subjects walk or run or twirl can be great practice in composition.
- Leading lines: Using lines that already exist within your background or setting can help you set up subjects. “Leading lines” refer to lines in a setting that may naturally draw the eye to the subject. If you’re photographing a couple in the mountains, be cognizant to position them in a manner where the horizon and lines comprising the shape of the mountain aren’t directly cutting through them, but rather naturally leading the eye to them.
7. Learn to develop film at home
Once you’ve gotten the hang of shooting film and sending off your film stocks to be developed, you can try developing them at home. Many photographers opt to do this as a part of the full process of shooting film.
For this, you’ll need the following:
- Black and white developer and fixer
- Convenient access to a water supply link in a kitchen or bathroom–this is the location the film developing will take place. Note: if you have a high level of minerals in your water, you may want to use filtered water instead.
- Developing tank where you’ll place your film and chemicals during the process
- Film reels to hold your film while the chemicals in the developing tank are put on the film’s surface
- A changing bag to move the film from its canister to the developing tank without exposing it to light
- Developing chemicals including developer, stop bath, and fixer, which can come as liquids or powders
- Measurement tools to ensure you have the correct amount of each chemical for development
- Safety Goggles. When working with or around chemicals, be smart and wear eye protection.
- Scissors for cutting your film and something to easily pry open canisters like a bottle opener or pliers
Check out tutorials for developing film to guide you through the process before you start. We recommend starting with developing black and white film first, since it’s generally easier to learn!
8. Embrace the art of trial and error
One of the best things you can do while learning film photography is to keep track of your settings for each photo you take and then look back at these recorded settings to see what worked and what didn’t.
And don’t feel discouraged if your first developed roll of film doesn’t look exactly like you pictured! That’s all a part of the process. Sometimes the most imperfect photos have the most accidentally gorgeous output. Fresh composition and creative ideas can ensure you keep your work artistic and meaningful.
Start by exploring KEH’s wide selection of used film cameras, and learning more about what it feels like to shoot film in a digital age.

